17 July 2026
In the previous BandTools post I wrote about a controller concern that protects sensitive actions. This time the focus is on the model layer: a small Rails concern that stops certain records from being destroyed in the wrong way.
In BandTools, every user owns a handful of records that are inseparable from the account itself. Subscribe, confirmation, archive and unsubscribe pages are modelled with single-table inheritance (STI): one pages database table, a base Page model, and subclasses that share that table while behaving as distinct types. Rails stores the subclass name in a type column so ArchivePage, ConfirmationPage, SubscribePage and UnsubscribePage can all be loaded from the same rows:
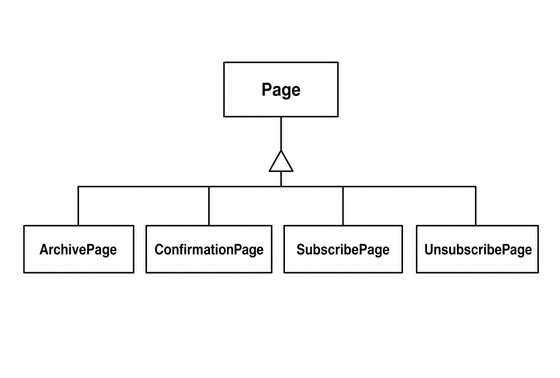
There is also a ConfirmationEmail that customises the message sent when someone joins a mailing list. Each of these is a singleton for the account: one page of each type, and one confirmation email. That makes a direct destroy especially costly. You are not removing one of many interchangeable rows; you are removing the only copy while the account is still active. These records should disappear only when the user does.
Rails makes the happy path easy. On User you declare the associations with dependent: :destroy:
has_one :confirmation_email, dependent: :destroy
has_many :pages, dependent: :destroy
Destroy the user and the pages and confirmation email go with them. The problem is the unhappy path: a direct call such as page.destroy or confirmation_email.destroy from a console session, a misplaced controller action, or a future refactor. Without an extra guard, that call succeeds and leaves the account in an inconsistent state.
ProtectsFromDirectDestruction closes that gap. The entire concern is a dozen lines:
module ProtectsFromDirectDestruction
  extend ActiveSupport::Concern

  included do
    before_destroy :prevent_direct_destroy_unless_association
  end

  private

  def prevent_direct_destroy_unless_association
    return if destroyed_by_association.present?

    errors.add(:base, "#{self.class.name} cannot be deleted directly.")
    throw(:abort)
  end
end
When the module is mixed in, it registers a before_destroy callback. That callback asks a simple question: is this destroy happening because a parent association asked for it?
Rails answers that question via destroyed_by_association. When a parent with dependent: :destroy tears down its children, Active Record sets that attribute on each child to the association reflection that triggered the cascade. A direct call to destroy leaves it blank. The callback treats a present value as permission to proceed, and anything else as a refusal.
Refusal uses the standard Active Record abort pattern: add an error to the base of the record, then throw(:abort). That cancels the destroy transaction, leaves destroy returning a falsey result, and keeps the row in the database. Callers that use destroy! will see an exception instead, which is usually what you want in a console or a test when something unexpected tried to delete a protected record.
Using the concern is a one-liner on each protected model:
class Page < ApplicationRecord
  include ProtectsFromDirectDestruction

  belongs_to :user
  # ...
end

class ConfirmationEmail < ApplicationRecord
  include ProtectsFromDirectDestruction

  belongs_to :user
  # ...
end
Because Page uses STI, a ConfirmationPage, SubscribePage and the rest all inherit the protection from the base class. That shows up in the error message: because self.class.name is the STI subclass, a failed destroy reports “ConfirmationPage cannot be deleted directly.” rather than a generic Page message. That makes debugging in the console a little clearer.
The behaviour is covered by a pair of tests. The first asserts that calling destroy on a page does not change the Page count and that the expected error is present. The second destroys the owning user and asserts that the page is gone:
test "prevents direct destruction of page" do
  assert_no_difference "Page.count" do
    result = @page.destroy
    assert_not result
  end

  assert_includes @page.errors[:base], "ConfirmationPage cannot be deleted directly."
end

test "allows destruction via user association" do
  @user.destroy
  assert_nil Page.find_by(id: @page.id)
end
That second test is the important counterpart. A guard that blocked every destroy would be worse than no guard at all, because account deletion would leave orphaned pages and confirmation emails behind. The destroyed_by_association check is what keeps parent-driven cleanup working while still rejecting the direct call.
I like this pattern because it encodes an invariant in the model rather than relying on every caller to remember the rule. Controllers, jobs, and console experiments can all call destroy; the protected models refuse unless the parent association is doing the work. For records that only make sense as part of a larger aggregate, that is exactly the behaviour you want.
10 June 2026
I’ve been building BandTools, a newsletter platform for musicians. As the application has grown, so has the surface area of sensitive actions a signed-in user can perform: changing account settings, enabling two-factor authentication, and viewing recovery codes. Signing in once and staying signed in is convenient, but it creates a problem if someone else gains physical access to an unlocked browser session.
Sudo mode addresses this. The name comes from the Unix sudo command, which lets you run a single privileged command after re-entering your password, without starting a new login session. Web applications use the same idea under various names; GitHub calls it “sudo mode”, and it’s the pattern I adopted for BandTools.
The goal is straightforward: even if you’re already signed in, certain actions require you to prove your identity again. That protects critical changes from being made via an unattended session at a shared computer, or from a session left open on a laptop that’s briefly out of sight.
BandTools tracks sudo mode with a session timestamp. When a user successfully re-authenticates, the current time is stored in session[:sudo_mode_authenticated_at]. On subsequent requests, the application checks whether that timestamp falls within a configurable timeout window. The default is thirty minutes, controlled by the sudo_mode_timeout_minutes system setting.
There’s a sensible exemption: if the user’s main login session was created within the timeout period, sudo mode is implicitly active. There’s no point asking someone to re-enter their password immediately after they’ve just signed in.
When a protected action is requested and sudo mode isn’t active, the user is redirected to a dedicated re-authentication screen. After successful verification they’re sent back to whatever they were trying to do.
The core logic lives in a Rails concern at app/controllers/concerns/sudo_mode.rb. Any controller that needs protection mixes in the SudoMode module and declares which actions require sudo mode using a class method:
module SudoMode
  extend ActiveSupport::Concern

  included do
    before_action :require_sudo_mode!, if: -> { self.class.sudo_protected_actions.include?(action_name.to_sym) }
  end

  class_methods do
    def require_sudo_for(*actions)
      @sudo_protected_actions = actions
    end

    def sudo_protected_actions
      @sudo_protected_actions || []
    end
  end

  private

  def require_sudo_mode!
    return if sudo_mode_active?

    to = request.fullpath
    redirect_to new_sudo_session_path(to:)
  end

  def sudo_mode_active?
    return false unless Current.user

    timeout = SystemSetting.sudo_mode_timeout_minutes.minutes

    Time.at(session[:sudo_mode_authenticated_at] || 0) > timeout.ago ||
      (Current.session&.created_at && Current.session.created_at > timeout.ago)
  end

  def activate_sudo_mode!
    session[:sudo_mode_authenticated_at] = Time.current.to_i
  end
end
The require_sudo_for class method stores the list of protected action names. A before_action filter runs require_sudo_mode! only when the current action is in that list. If sudo mode isn’t active, the filter stashes the requested URL and redirects to the sudo session screen.
The sudo_mode_active? method implements the two conditions described above: either the sudo timestamp is recent enough, or the login session itself is recent enough. Storing the timestamp as an integer epoch value keeps the session payload small and avoids serialisation surprises.
Protecting a controller action is then a one-liner. For example, the two-factor authentication setup controller declares:
class TwoFactorAuthController < ApplicationController
  include SudoMode

  require_sudo_for :new
end
Similar declarations protect account settings, recovery codes, API token management, and custom domains.
The SudoSessionsController handles verification. For users who signed in with a password, the flow is familiar: enter your password again, and on success the sudo timestamp is set and you’re redirected back.
def create
  username = Current.user.username
  password = params[:password]

  if User.authenticate_by(username:, password:).present?
    session[:sudo_mode_authenticated_at] = Time.current.to_i
    redirect_to safe_redirect_path
  else
    flash.now[:alert] = "The password you entered is incorrect. Please try again."
    @redirect_path = safe_redirect_path
    render :new, status: :unprocessable_content
  end
end
For users who signed in via Google, prompting for a password they may not have set would be confusing. Instead, the sudo screen shows which Google account they’re signed in as and offers a “Continue with Google” button that triggers a fresh OAuth flow.
The application tracks how the user originally signed in via session[:signed_in_via_google], set during the sign-in process (including after completing two-factor authentication). When the sudo screen detects this flag and the user has a linked Google account, it stores the redirect path in session[:sudo_google_redirect] and renders the Google re-auth view.
After OAuth completes, the callback controller checks whether this is a sudo re-authentication rather than a normal sign-in:
def handle_sudo_google_auth(auth)
  redirect_path = session.delete(:sudo_google_redirect)
  linked_account = Current.user.linked_accounts.find_by(provider: auth.provider, uid: auth.uid)

  if linked_account
    session[:sudo_mode_authenticated_at] = Time.current.to_i
    redirect_to url_from(redirect_path) || root_path
  else
    redirect_to new_sudo_session_path(to: redirect_path),
      alert: "The Google account you authenticated with does not match your linked account."
  end
end
The OAuth UID must match the user’s linked Google account. A mismatch sends the user back to the sudo screen with an error, which prevents someone from authenticating with a different Google account to gain elevated access. If a user signed in via Google but has since unlinked their Google account, the sudo screen falls back to the password prompt.
Sudo mode is enforced across the parts of BandTools where the consequences of unauthorised access are highest:
- Account management: editing account settings and confirming account deletion
- Two-factor authentication: setting up 2FA and viewing recovery codes
- API tokens and custom domains: creating, editing, and revoking credentials
The pattern is consistent: include SudoMode, call require_sudo_for with the action names, and the filter handles the rest. Views can also check sudo_mode_active? if they need to reflect the current state, although in practice the controller filter is sufficient for enforcement.
Sudo mode isn’t a substitute for proper session management, strong passwords, or two-factor authentication. It’s an additional layer that closes a specific gap: the gap between “someone is signed in” and “someone at this keyboard right now is the person who signed in”. For a SaaS application handling musician mailing lists and payment details, that’s a gap worth closing.
16 March 2018
Last time we talked about how to add authentication to a Sinatra application. You might want to read that first to refresh your memory. This time I’m going to show you how I built upon that approach to add two-factor authentication. To recap, two-factor authentication (often shortened to 2FA) is a form of multi-factor authentication. The idea is that the user must present two or more pieces of evidence (factors) to an authentication mechanism to prove their identity. Commonly this is something they know e.g. some sign-in credentials such as a username and password, and something only they are in possession of.
This second factor often takes the form of a small hardware device with a display, or more recently an authenticator mobile app, such as Google Authenticator or Authy to name just two. Both have the same purpose, which is to generate a unique token that is entered into the authentication system. Typically this token is a number. The device or app has to be provisioned first before it can be used as part of the authentication process.
This provisioning step generates a random secret key that is unique to that user. This key is used as part of the token generation algorithm. It is often in base 32 and should be held securely server-side along with the user’s credentials and other account details. A URL using the otpauth:// scheme can then be constructed that includes the secret key as a query string parameter. From this URL a QR code can be generated that the user scans once to set up their authenticator app. Then the app can be used at any time to generate tokens that are guaranteed to be valid for that user’s account within that application. During the sign-in process, if both the credentials (first factor) and token (second factor) are correct, authentication succeeds and the user is granted access.
Two-factor authentication has become more common in recent years as online security has tightened up. I think I first came across it when I enabled it for my Gmail account several years ago. At first it seemed like magic and I didn’t understand how the numeric token was generated or verified. As always, once you understand the principles it’s actually pretty straightforward.
The fundamental concept is that of a one-time password or OTP. As the name suggests, OTPs are only valid for a single authentication transaction. Amongst other things this has the advantage that they’re not vulnerable to replay attacks. One type of OTP is a time-based one-time password (TOTP) and that’s what we’ll be using here. If you want to geek out on the low-level details of TOTP, take a look at RFC 6238.
The Ruby One Time Password library is a fantastic RubyGem that does all the 2FA heavy lifting for us. As previously, I’ve created a minimal example application and put the source code on GitHub. This application demonstrates the use of a TOTP and an authenticator app. Let’s take a look.
As before the authenticate! method is a helper method that’s used to intercept requests to URLs that require authentication and present the sign-in screen if no user is current authenticated. However, it now requires a valid token object in the HTTP session. This token object is simply a boolean flag the indicates the user has previously successfully entered their second factor. If the token object is not present then the user is prompted to sign in again. Here’s the code from lib/authentication.rb:
module Authentication
  def authenticate!
    unless session[:user] && session[:valid_token]
      session[:original_request] = request.path_info
      redirect '/signin'
    end
  end
end
Moving to app.rb, the route that the sign-in form POSTs to is a bit more involved this time:
post '/signin/?' do
  if user = User.authenticate(params)
    session[:user] = user
    if request.cookies[NO_2FA_COOKIE]
      session[:valid_token] = true
      redirect_to_original_request
    else
      redirect '/signin/secondfactor'
    end
  else
    flash[:notice] = 'You could not be signed in. Did you enter the correct username and password?'
    redirect '/signin'
  end
end
The flow is complicated slightly, because as a convenience to the user I’m offering a checkbox that when ticked will prevent them being prompted for the second factor until thirty days have elapsed. This is implemented as a browser cookie, the existence of which is checked rather than its actual value.
If the cookie with the name represented by the NO_2FA_COOKIE constant exists, then the valid token flag the authenticate! method checked earlier is put in the session and the user is sent on their way without seeing the second factor screen. If the cookie doesn’t exist then an HTTP redirect occurs to the second factor screen, which looks like this:
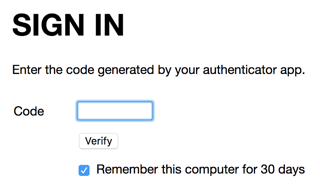
That second factor form submits an HTTP POST request to the /signin/secondfactor route, the handler code for which is shown below:
post '/signin/secondfactor/?' do
  unless session[:user]
    flash[:notice] = 'Your session has expired. Please sign in again.'
    redirect '/signin'
  end
  if session[:user].verify_code(params)
    if params[:rememberme]
      response.set_cookie(NO_2FA_COOKIE, value: '1', max_age: THIRTY_DAYS.to_s)
    else
      response.delete_cookie(NO_2FA_COOKIE)
    end
    session[:valid_token] = true
    redirect_to_original_request
  else
    flash[:notice] = 'The code you entered is incorrect. Please try again.'
    redirect '/signin/secondfactor'
  end
end
If there’s no valid user object in the HTTP session (perhaps because the user’s session has expired) then a message is displayed and an HTTP redirect is performed to the sign-in page. The actual verification of the entered 2FA token or code happens next. The instance of the User class (lib/user.rb) that represents the current user is retrieved from the session and a new verify_code method performs the verification. The code for this method is shown below:
def verify_code(params = {})
    code = params[:code]
    return false if code.blank?

    totp = ROTP::TOTP.new(@@credentials['secret'])
    totp.verify(code)
  end
First a simple sanity check is undertaken that a code was entered at all. The method fails i.e. returns false if one wasn’t. Next the ROTP RubyGem is used to create a new TOTP object, passing in the valid secret that was previously generated as part of the provisioning process (this will be detailed later). As per last time, all of the valid authentication information is stored in a YAML configuration file named credentials.yml in order to keep the example application simple. For a real application this would probably be stored safely away in a database table.
Finally, the TOTP object’s verify method is called to verify the second factor code entered by the user and this boolean becomes the verify_code method’s return value. One nicety of the ROTP gem is that it also provides a verify_with_drift method that can be used to accommodate slight differences in time that might be present between the authenticator app running on the mobile device and the server where the web application is running. The ROTP gem’s README has the details.
Once the code entered by the user has been successfully verified, there’s some bookkeeping around creating or deleting the cookie depending on whether the Remember this computer for 30 days checkbox is checked or cleared. The last step within the POST route handler for the second factor form is to store the valid token flag in the HTTP session and perform an HTTP redirect to whatever URL the user was originally trying to go to.
Whilst we’re talking about the second factor form, one important subtlety is that an attacker might guess the form’s URL and go straight to it in an attempt to completely bypass having to enter any sign-in credentials (first factor). We prevent this by checking there’s a user object in the HTTP session before presenting the second factor form, regardless of how it was arrived at:
get '/signin/secondfactor/?' do
  unless session[:user]
    flash[:notice] = 'Please sign in first.'
    redirect '/signin'
  end
  erb :second_factor, locals: { title: 'Sign In' }
end
The /signout route is more or less the same as before, the only addition being a line of code that removes the valid token object from the session. This is what the route handler looks like now:
get '/signout' do
  session[:user] = nil
  session[:valid_token] = nil
  flash[:notice] = 'You have been signed out.'
  redirect '/'
end
The only detail left to cover is to go right back to the beginning with the generation of the base 32 secret key that’s used to provision the authenticator app. As usual, the ROTP gem’s got us covered. The snippet below illustrates creating a new ROTP::TOTP instance seeded with a base 32 secret and then generating a provisioning URI:
require 'rotp'

secret_key = ROTP::Base32.random_base32 # => 'sud5pjpxpqbfflu7'
totp = ROTP::TOTP.new(secret_key)
totp.provisioning_uri('user@example.org') # => 'otpauth://totp/user@example.org?secret=sud5pjpxpqbfflu7'
In time-honoured fashion I’ll leave it as an exercise for the reader to wrap this up into a sign-up flow that stores the secret key and includes the generation and display of a QR code an authenticator app can consume.
21 February 2018
The Docker Book is a self-published e-book written by former Kickstarter CTO James Turnbull. I bought the PDF version for $9.99 because I wanted to quickly get up to speed with the world of Docker. The book contains nine chapters comprising installing Docker, working with containers, images and repositories, to more advanced topics such as using Docker containers as part of a continuous integration process (think of a poor man’s Travis equivalent), composing a multi-application stack and using the Docker API.
After reading the first few chapters I was up to speed with the basics of working with Docker and picked up some useful tips. For example, making use of the ENV command within a Dockerfile to control the build cache and using ENTRYPOINT and CMD together to execute default commands that can be overridden when launching a container.
There are three areas where I think The Docker Book could be improved, two of which are where its self-published origins peek through the surface. The first is that the book is rather light on illustrations. A few well-placed diagrams would really help in some of the later topics to clarify the architecture of containers, hosts and networking the book is getting you to build.
The second weak area is the copy editing, some of which is pretty poor towards the end of the book, at least in the revision I read. You get a palpable sense of the author getting tired and wanting to complete the project. I noticed on the companion website there’s a (currently) unpublished revision that claims to fix a lot of errata, so hopefully that will be made available soon.
The third shortcoming I found is that some of the technical instructions could use a little more detail. I realise that Docker runs on multiple operating systems and therefore a comprehensive set of instructions covering every eventuality isn’t feasible, but more clarity on whether the instructions provided are for Linux or macOS would be a welcome start, because it isn’t always obvious. The detail is also a little light in the Docker orchestration and service discovery chapter, which has you creating three hosts without any specific guidance on how to do so. I ended up creating three Ubuntu virtual machines in VirtualBox, but ran into difficulties later in the chapter due to a port clash between a built-in Ubuntu DNS service and a port the book wanted to bind to Consul. If the author had provided some lightweight detail on how he did it I could have avoided that wasted time.
Overall though these are fairly minor niggles. In reading The Docker Book I achieved my objective of bringing my Docker knowledge up to a working level. I recommend it for the price if you need to do the same. Based on my experience reading The Docker Book I shall likely buy The Terraform Book by the same author.
18 September 2016
Imagine how you’d feel if you woke up one morning and the operation of all the light switches in your home was reversed. Suddenly everything you thought you knew about how to use your own light switches is wrong. You’d feel pretty bewildered, right? Probably angry too. Maybe in time you could get used to the new world order of light switch operation, but maybe you’d never get used to it. Your mental model of how light switches work based on years of experience would be completely broken. OK, it’s a silly hypothetical example, but those emotions are an accurate description of how I felt recently upon installing iOS 10 on my iPhone.
iOS 10 brings some great new features and advancements, but upon first running it my initial impression was one of total confusion because I could no longer work out how to unlock my phone! It turns out I’d taken the successful accomplishment of this operation for granted during the previous seven years of iPhone ownership. My mental model of how to unlock an iOS device had been broken by the changes Apple introduced to the way the iOS lock screen works. Judging by the comments I’ve seen since iOS 10’s introduction, I’m certainly not alone.

In all versions of iOS prior to iOS 10, unlocking the device took you to the familiar home screen of app icons, or SpringBoard to give it its technical name. With iOS 10, Apple introduced a new conceptual layer in-between SpringBoard and the lock screen where widgets and notifications are shown. In spite of having read about iOS 10’s features before its release, I hadn’t appreciated that this was the case and therefore hadn’t updated my mental model accordingly. When I pressed my thumb against the Home button I expected Touch ID to unlock my phone and take me to the home screen as usual. Instead what happened was I got a confusing and seemingly random prompt about pressing Home to open.
After much head-scratching and some experimentation, I worked out what the new model is. Unlocking the phone actually just unlocks the widget/notifications layer and from there you can press the Home button to go to the home screen. I generally don’t like to veer too far from what Apple considers the best defaults and tried to get used to the new behaviour, but unfortunately after seven years I couldn’t reprogram my mental model. Fortunately I was able to revert the lock screen to iOS 9 levels of sanity by going into Settings -> General -> Accessibility -> Home Button and enabling the Rest Finger to Open option.
The lock screen isn’t the only area where iOS 10 broke my long-established mental model. The Mail app displays a list of your emails from most recent at the top to older ones at the bottom:
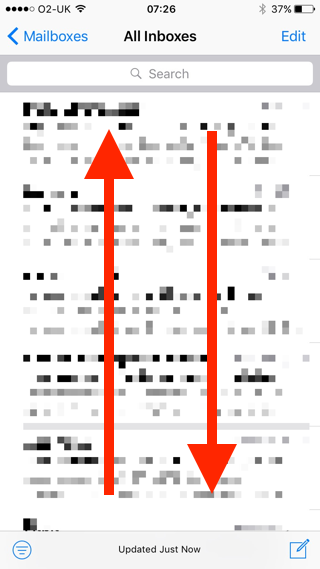
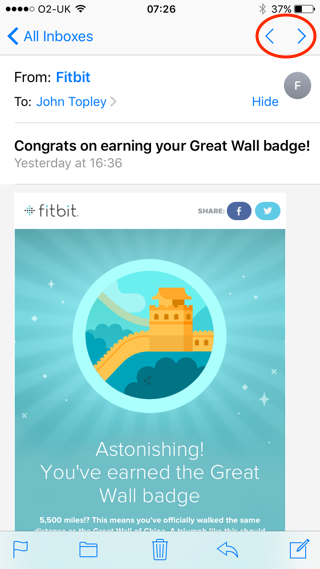
Prior to iOS 10, when opening a single email to view it, a couple of handy buttons in the top-right hand of the toolbar would let you quickly open the previous or next email in your inbox. The buttons displayed arrows that matched the chronological orientation of the inbox on screen. Pressing the up arrow opened the next newer email if there was one and pressing the down arrow opened the next older one.
In iOS 10 these arrows have been tweaked so they match the back and forward controls in a web browser. Which seems like it might be a good idea in terms of consistency, only it’s broken my model model and means I now have to think briefly about which button is the correct one to press for what I want to achieve instead of it being able to do it automatically.
Starting with pioneering the commercial use of the graphical user interface in the 1980s, Apple forged a well-deserved reputation for industry-leading computer usability. I’m not someone who doesn’t like progress, but sadly I think this reputation has been eroded in recent years. I can understand the reasoning behind the iOS 10 lock screen changes, which are as a result of being able to do much more via widgets without having to fully unlock your phone. However, there’s the very real downside of confusion and frustration for the millions of iPhone users who haven’t read anything about iOS 10 other than its public availability and who suddenly find their familiar and comfortable mental models of how the thing works completely shattered.
The Mail app change is worse in terms of justification; it feels like a gratuitous change for change’s sake. I like to imagine that Apple still has a usability lab and does actual usability testing with real users, but in truth it’s hard to know nowadays. I can’t help feeling that if they did they’d have a better understanding of the consequences of breaking long-standing mental models.
24 February 2016
In a break from our irregularly-scheduled programme, I want to write briefly about some important basic security principles for personal computing. Modern computing devices and the cloud have ushered in an amazing era of ubiquitous computing, but also of an increased complexity burden on the individual in managing their access to it all. A series of small bad decisions taken in combination can easily lead to a disaster whereby you lose access to your entire digital life. This happened to someone I follow on Twitter today. Allow me to describe what happened to them and most importantly where they went wrong and how to avoid repeating their mistakes.
The individual concerned sensibly uses 1Password to generate and store strong unique passwords for all the online services they use. I can’t recommend 1Password highly enough, it’s the one piece of software that has had the most impact on improving my digital life since I first started using it two years ago. Our subject syncs their 1Password data between their Mac and iOS device(s) using iCloud and their Apple ID is among the passwords managed by 1Password. Today they used 1Password to generate a new Apple ID password and that’s when things quickly turned very bad for them.
When 1Password generates a new password, it creates a new item for it under its Passwords category, but it also helpfully copies the new password to the clipboard. As a security feature, by default it automatically clears the clipboard after a time period (I think the default is 90 seconds), because you don’t want passwords lingering on the clipboard ready to be accidentally pasted somewhere. Unfortunately our subject didn’t realise that 1Password has this security feature and got locked out of their Apple ID, because the only place their new password existed was on the clipboard which had just been cleared!
They couldn’t get back in to 1Password to retrieve their new Apple ID password because 1Password was set up to use iCloud as its sync engine, which had just stopped working because they’d changed their Apple ID. They couldn’t get in to their Mac because it was configured to use an iCloud login. Apple couldn’t help them recover their password because sensibly they had two-factor authentication turned on, but had opted to store the recovery key in, you guessed it, 1Password. The whole sorry saga is an example of what can happen when you put all your digital eggs in one basket. In this case it was an over-reliance on iCloud.
The takeaway from all this is that you should think carefully about your current security set-up and run through various what if? scenarios to identify where you’ve built up a vulnerable position because of dependency cycles. I did this a while ago and describe my current approach below:
- My 1Password master password, Apple ID password, Dropbox password and Backblaze password were all generated using Diceware (so they’re actually passphrases) and I’ve memorised them. I know the promise of password managers such as 1Password is that you only have to remember one password (the clue’s in the name!), but it’s vital that I be able to gain access to those services without using 1Password. In practice, memorising four passphrases really isn’t so hard
- I regularly practise logging in using the four passphrases above. By necessity I’m entering my 1Password master password every day anyway and regularly get prompted to enter my Apple ID password
- My Apple ID two-factor authentication recovery key is stored in 1Password, but I also carry a hard copy with me
- I use Dropbox for syncing my 1Password data, because unlike iCloud it’s never missed a single beat in the seven years I’ve been using it. That’s how you build a good reputation!
- If I lose access to Dropbox for some reason, I can still retrieve my 1Password data files from my Backblaze online backup as the passphrase to log in is one of the four I’ve memorised
- This one’s less important, but I don’t use iCloud login on my Mac, so if there’s a problem with iCloud I can still use my computer
- I regularly back up my Mac (which includes my 1Password data files from Dropbox) using both Time Machine and SuperDuper!
22 February 2015
I thought I’d take a little break from blogging about iOS app development to write about how I added authentication to a Ruby web application recently.
I’m a big fan of the Sinatra micro framework for when the full-stack Ruby on Rails framework is too heavyweight. I like Sinatra because it makes writing
simple (or fairly simple) web applications really easy, whilst allowing you to make your own choices about the model and view layers.
As you might imagine given its simplicity, Sinatra has no built-in support for performing authentication. When I needed to add it to an application I was
working on the other day I had a look to see what existing solutions were out there. It’s easy to implement HTTP basic authentication
using Sinatra, but I wanted to use my own sign-in page that matched the styling of the rest of the application, rather than rely on the ugly browser-provided authentication dialogue.
Warden is a deservedly popular and powerful Ruby authentication framework and there’s a nice Sinatra example application,
but looking at the code it looked a bit heavyweight and not quite straightforward enough for my needs, with its support for multiple authentication strategies. Therefore I decided to roll my own solution.
Of course, the first rule of security is never to roll your own solution, because inevitably someone out there has already done what you’re trying to do and in a better and more secure way. However, I’m not
talking about setting out to implement my own cryptography algorithm or anything crazy like that. What I did was implement the username and password checking and the required routing logic, whilst relying on industry standard
encryption using bcrypt.
I’ve extracted my solution into a minimal example application and the source code is available on GitHub for you to follow along. I’d also appreciate it if you let me know
of any flaws you discover in my approach (pull requests welcome). Note that this blog post assumes a basic familiarity with Sinatra. If you don’t have that then I recommend reading the
getting started guide.
Most of the action takes place in app.rb. Routes within the application that are to be secured should have authenticate! as their first line, as for the /protected route in the example code:
get '/protected/?' do
  authenticate!
  erb :protected, locals: { title: 'Protected Page' }
end
The authenticate! method is declared as a helper method and implemented in the Authentication module in lib/authentication.rb. Here’s the code:
module Authentication
  def authenticate!
    unless session[:user]
      session[:original_request] = request.path_info
      redirect '/signin'
    end
  end
end
As you can see, there’s not much to it. If there’s no user object in the HTTP session then the incoming URL is stashed in the session under the
:original_request key and an HTTP redirect is performed to the sign-in page. The /signin route just renders the sign-in page:
get '/signin/?' do
  erb :signin, locals: { title: 'Sign In' }
end
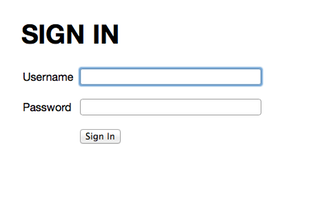
That sign-in form submits an HTTP POST request to the /signin route, the code for which is shown below:
post '/signin/?' do
  if user = User.authenticate(params)
    session[:user] = user
    redirect_to_original_request
  else
    flash[:notice] = 'You could not be signed in. Did you enter the correct username and password?'
    redirect '/signin'
  end
end
The first line of this route calls the User class’s authenticate class method, passing the params hash. This is an object Sinatra automatically
provides to routes that contains all the parameters for the current HTTP request. In this case it contains the username and password from the submitted form.
The authenticate class method acts as a factory method in that it returns an instance of the User class if the authentication succeeded, otherwise
it returns nil. If nil is returned then the assignment to the user local variable fails. This causes the else clause to be entered, which displays
a message and performs a redirect back to the /signin route shown above so the sign-in form is displayed again. The current implementation does not limit
the number of sign-in attempts, although this wouldn’t be too difficult to add.
The actual authentication logic is contained within the User class in /lib/user.rb. The implementation is shown below:
require 'bcrypt'
require 'yaml'

class User
  include BCrypt
  attr_reader :name

  def self.authenticate(params = {})
    return nil if params[:username].blank? || params[:password].blank?

    @@credentials ||= YAML.load_file(File.join(__dir__, '../credentials.yml'))
    username = params[:username].downcase
    return nil if username != @@credentials['username']

    password_hash = Password.new(@@credentials['password_hash'])
    User.new(username) if password_hash == params[:password] # The password param gets hashed for us by ==
  end

  def initialize(username)
    @name = username.capitalize
  end
end
I need to make a couple of important points before discussing this code. The first is that to keep the example application simple I’m storing the
username and hashed password in a YAML configuration file named credentials.yml. Whilst this is certainly one approach, it doesn’t scale to more
than one user! Therefore in reality you’d want to store this data in a database table. For my real application I used MySQL and created a users table
and a Ruby class that encapsulates access to it.
The second point is that this blog post is not going to cover how users register to use the application and therefore how user accounts get created.
With those caveats out the way, on to the code.
The User class mixes in the BCrypt module from the bcrypt RubyGem. Our class has one read-only property, which is the
name of the signed in user. This is just a convenience so it can be easily displayed on the screen. If the entered username or password (as
provided by the params hash) are blank strings, the authenticate class method immediately fails and returns nil. It also fails if the username
isn’t known to the application. Note that when using a database at this point you’d perform a SQL query with a WHERE clause to fetch the user record by the
entered username.
The Password.new method creates a Password object from the stored password hash. The Password object comes from the included BCrypt module. This module also overrides the
double equals (==) method within the Password class. Another instance of Password is created from the entered password and the two
instances are compared for equality. If they are equal then the passwords match and a User instance is returned from the method. Otherwise, nil is returned and
again authentication fails.
Back over in app.rb, if authentication succeeded then the returned User object is stored in the session and the redirect_to_original_request helper method is called.
The code for this method is shown below:
def redirect_to_original_request
  user = session[:user]
  flash[:notice] = "Welcome back #{user.name}."
  original_request = session[:original_request]
  session[:original_request] = nil
  redirect original_request
end
The User object is retrieved from the session and a message displayed welcoming the user back. The original URL is also retrieved and a redirect performed
to that URL. This is so the user is taken back to the page they originally requested before their request was intercepted by the sign-in process.
The only thing left to cover is the /signout route, which looks like this:
get '/signout' do
  session[:user] = nil
  flash[:notice] = 'You have been signed out.'
  redirect '/'
end
The User object is removed from the session because there is no current user as they’ve signed out. You may recall that not having a User object in
the session causes the Authentication module to intercept any requests for pages matching routes protected by a call to the authenticate! method and
the whole cycle starts again.
20 November 2014
iOS 8 ushered in a new era of inter-app sharing and collaboration with its app extensions. Prior to iOS 8, apps were pretty much limited
to using custom URL schemes for inter-app communication. In the same way that Apple provides support for web pages, email, telephony and text messaging via the http, mailto, tel and sms URL schemes
respectively, apps can expose an automation interface by declaring their own custom protocol, also known as a URL scheme.
The idea is pretty simple: when a URL that uses the app’s custom protocol is accessed, the app launches and performs the action encoded within the URL. What the
action does is entirely down to the developer of the app. It’s even possible to test these custom URLs using nothing more than Mobile Safari.
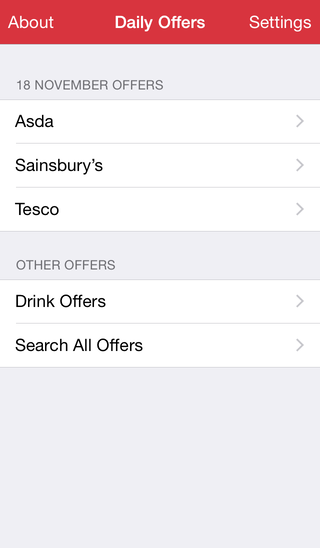
For Daily Offers 1.3.1 released in August 2013, I added support for the following custom URL scheme:
- ukdailyoffers:// —launch the app, returning to the previous screen
- ukdailyoffers://asda —show Asda offers
- ukdailyoffers://sainsburys —show Sainsbury’s offers
- ukdailyoffers://tesco —show Tesco offers
- ukdailyoffers://drinks —show drink offers
- ukdailyoffers://search?term=<text>&order=<alpha | price> —search for <text>, ordered alphabetically or by price
The DailyOffers-Info.plist file includes the XML snippet below that registers this ukdailyoffers URL scheme:
<key>CFBundleURLTypes</key>
<array>
  <dict>
    <key>CFBundleTypeRole</key>
    <string>Editor</string>
    <key>CFBundleURLName</key>
    <string>com.sideprojectsoftware.ukdailyoffers</string>
    <key>CFBundleURLSchemes</key>
    <array>
      <string>ukdailyoffers</string>
    </array>
  </dict>
</array>
When another app such as Launch Center Pro fires off a conforming URL (e.g. ukdailyoffersapp://search?term=half+price), the app delegate’s application:openURL:sourceApplication:annotation: method
is called. Here’s the body of that method within the SPSAppDelegate class implementation:
- (BOOL)application:(UIApplication *)application openURL:(NSURL *)url sourceApplication:(NSString *)sourceApplication annotation:(id)annotation
{
    SPSURLSchemeController *controller = [[SPSURLSchemeController alloc] initWithURL:url];
    [controller pushSupermarketsViewController];
    self.window.rootViewController = controller.rootViewController;
    [self.window makeKeyAndVisible];

    return [controller launch];
}
As you can see, the SPSURLSchemeController class does most of the work. The incoming URL is passed to its initWithURL: method. Here’s the header
file code for SPSURLSchemeController:
//
//  SPSURLSchemeController.h
//  Daily Offers
//
//  Created by John Topley on 03/08/2013.
//  Copyright (c) 2013 John Topley. All rights reserved.
//

@interface SPSURLSchemeController : NSObject

@property (weak, nonatomic, readonly) UINavigationController *rootViewController;

- (instancetype)initWithURL:(NSURL *)url;
- (void)pushSupermarketsViewController;
- (BOOL)launch;

@end
As well as the initializer method, there are two other methods. From the user’s perspective, invoking a custom URL appears to jump to a screen
in the “middle” of the app without first having to navigate through the screen hierarchy. This means that the view controller stack has to
be set up accordingly behind the scenes, which is what the pushSupermarketsViewController method does (the supermarkets screen is the first screen in the app
and hence the first view controller).
The launch method is where the real work happens, as it invokes one of two methods exposed by the SPSSupermarketsViewController class, depending on
the action that’s been requested; but more about those later. The implementation of the initWithURL: and pushSupermarketsViewController methods is shown below:
//
//  SPSURLSchemeController.m
//  Daily Offers
//
//  Created by John Topley on 03/08/2013.
//  Copyright (c) 2013 John Topley. All rights reserved.
//

#import "SPSURLSchemeController.h"
#import "SPSSupermarket.h"
#import "SPSSupermarketIdentifiers.h"
#import "SPSSupermarketsViewController.h"
#import "SPSSearchQuery.h"
#import "SPSUserDefaults.h"

static NSString *const kMainStoryboard = @"MainStoryboard";
static NSString *const kSupermarketsViewController = @"SupermarketsVC";

@implementation SPSURLSchemeController {
    NSURL *_url;
    NSString *_path;
    SPSSupermarketsViewController *_supermarketsViewController;
}

- (instancetype)initWithURL:(NSURL *)url
{
    if ((self = [super init])) {
        _url = url;
        _path = [[url absoluteString] lastPathComponent];
    }

    return self;
}

- (void)pushSupermarketsViewController
{
    UIStoryboard *storyboard = [UIStoryboard storyboardWithName:kMainStoryboard bundle:nil];
    _rootViewController = [storyboard instantiateInitialViewController];
    _supermarketsViewController = [storyboard instantiateViewControllerWithIdentifier:kSupermarketsViewController];
    [self.rootViewController pushViewController:_supermarketsViewController animated:NO];
}

...

@end
As previously noted, when writing the code for Daily Offers my style was to assign values to instance variables directly
rather than using properties. The initWithURL: initializer method stores the URL and the path component of the URL (e.g. asda, tesco, search etc.) into a couple of
instance variables for use later by the launch method.
The pushSupermarketsViewController method first obtains a reference to the main storyboard file and then instantiates the root view controller within the storyboard. Next,
it instantiates the supermarkets view controller and pushes it onto the root view controller’s navigation stack. The implementation of the launch method is shown below:
//
//  SPSURLSchemeController.m
//  Daily Offers
//
//  Created by John Topley on 03/08/2013.
//  Copyright (c) 2013 John Topley. All rights reserved.
//

#import "SPSURLSchemeController.h"
#import "SPSSupermarket.h"
#import "SPSSupermarketIdentifiers.h"
#import "SPSSupermarketsViewController.h"
#import "SPSSearchQuery.h"
#import "SPSUserDefaults.h"

static NSString *const kMainStoryboard = @"MainStoryboard";
static NSString *const kSupermarketsViewController = @"SupermarketsVC";

// URL paths.
static NSString *const kDrinkPath = @"drink";
static NSString *const kSearchPath = @"search";

// Search constants.
static NSString *const kSearchQueryParameter = @"term=";

@implementation SPSURLSchemeController {
    NSURL *_url;
    NSString *_path;
    SPSSupermarketsViewController *_supermarketsViewController;
}

...

- (BOOL)launch
{
    if ([_path hasPrefix:kSearchPath]) {
        SPSSearchQuery *query = [[SPSSearchQuery alloc] initWithURL:_url];
        [_supermarketsViewController performSearchWithQuery:query];

    // Use hasPrefix: so //drink or //drinks work.
    } else if ([_path hasPrefix:kDrinkPath]) {
        SPSSupermarket *supermarket = [SPSSupermarket initWithDrinkOffers];
        [_supermarketsViewController loadOffersForSupermarket:supermarket];
    } else if ([kAsdaKey isEqualToString:_path] || [kSainsburysKey isEqualToString:_path] || [kTescoKey isEqualToString:_path]) {
        SPSSupermarket *supermarket = [[SPSUserDefaults sharedInstance] supermarketWithKey:_path];
        [_supermarketsViewController loadOffersForSupermarket:supermarket];
    }

    return YES;
}

@end
Depending on whether the action is to perform a search, show the drinks offers, or show the offers for a named supermarket, the method routes to either the
performSearchWithQuery: method or the loadOffersForSupermarket: method. There are a couple of points to note here:
- Drinks offers are treated as just another type of supermarket i.e. a collection of offers that are related in some way
- The SPSUserDefaults class (which acts as a façade to NSUserDefaults) can instantiate an SPSSupermarket model object when passed the name of a supermarket
Here are the declarations for those two methods in SPSSupermarketsViewController.h:
//
//  SPSSupermarketsViewController.h
//  Daily Offers
//
//  Created by John Topley on 05/04/2012.
//  Copyright (c) 2012 John Topley. All rights reserved.
//

#import "SPSSupermarket.h"
#import "SPSSearchQuery.h"

@interface SPSSupermarketsViewController : UITableViewController <UINavigationControllerDelegate>

#pragma mark - URL Scheme Support

- (void)loadOffersForSupermarket:(SPSSupermarket *)supermarket;
- (void)performSearchWithQuery:(SPSSearchQuery *)query;

@end
Taking the loadOffersForSupermarket: route first as it’s the simplest, the implementation simply performs a storyboard segue, passing the SPSSupermarket model
object as the sender:
#pragma mark - URL Scheme Support

- (void)loadOffersForSupermarket:(SPSSupermarket *)supermarket
{
    [self performSegueWithIdentifier:kShowOffers sender:supermarket];
}
The effect is the same as if the user had tapped on a row within the UITableView on the supermarkets screen to view the offers for that supermarket:
In order to understand the performSearchWithQuery: method, it’s first necessary to understand the SPSSearchQuery object that’s passed as an argument to that method.
This is the header file for SPSSearchQuery:
//
//  SPSSearchQuery.h
//  Daily Offers
//
//  Created by John Topley on 15/06/2014.
//  Copyright (c) 2014 John Topley. All rights reserved.
//

#import "SPSSearchResultsOrderEnum.h"

@interface SPSSearchQuery : NSObject

@property (readonly, nonatomic, assign) SPSSearchResultsOrder searchResultsOrder;
@property (readonly, nonatomic) NSString *searchTerm;
@property (readonly, nonatomic, assign) BOOL URLSchemeSearch;

- (instancetype)initWithSearchTerm:(NSString *)searchTerm;
- (instancetype)initWithURL:(NSURL *)url;

@end
As you might have guessed from its name, the purpose of this class is to represent a user’s search for an offer or product. It uses an
SPSSearchResultsOrderEnum to represent whether the search results are to be ordered alphabetically (the default) or in ascending price order:
//
//  SPSSearchResultsOrderEnum.h
//  Daily Offers
//
//  Created by John Topley on 19/06/2014.
//  Copyright (c) 2014 John Topley. All rights reserved.
//

typedef NS_ENUM(NSInteger, SPSSearchResultsOrder) {
    SPSSearchResultsOrderAlphabetical,
    SPSSearchResultsOrderPrice
};
SPSSearchQuery also has properties for the search term and a flag to record whether it came into life as a result of a URL scheme search or a user interface search.
This flag is used by the search results view controller to determine whether to use the explicit search results ordering set on the SPSSearchQuery instance (as
specified in the URL using the &order= query parameter), or the last ordering chosen by the user (which is stored as a user interface preference in NSUserDefaults).
The implementation of SPSSearchQuery is shown below:
//
//  SPSSearchQuery.m
//  Daily Offers
//
//  Created by John Topley on 15/06/2014.
//  Copyright (c) 2014 John Topley. All rights reserved.
//

#import <NSURL+QueryDictionary.h>
#import "SPSSearchQuery.h"
#import "NSString+DailyOffersAdditions.h"

// Valid query parameter keys and values.
static NSString *const kSearchOrderQueryParameter = @"order";
static NSString *const kSearchTermQueryParameter = @"term";
static NSString *const kSearchResultsOrderPrice = @"price";

@implementation SPSSearchQuery

- (instancetype)initWithSearchTerm:(NSString *)searchTerm
{
    if ((self = [super init])) {
        _searchTerm = [searchTerm copy];

        // Default to alphabetical search results ordering.
        _searchResultsOrder = SPSSearchResultsOrderAlphabetical;
    }

    return self;
}

- (instancetype)initWithURL:(NSURL *)url
{
    if ((self = [super init])) {
        NSDictionary *queryParams = [url uq_queryDictionary];
        _searchTerm = [queryParams[kSearchTermQueryParameter] copy];

        // Default to alphabetical search results ordering.
        _searchResultsOrder = SPSSearchResultsOrderAlphabetical;
        NSString *order = queryParams[kSearchOrderQueryParameter];

        if ([kSearchResultsOrderPrice sps_isEqualToStringIgnoringCase:order]) {
            _searchResultsOrder = SPSSearchResultsOrderPrice;
        }

        _URLSchemeSearch = YES;
    }

    return self;
}

@end
The initWithSearchTerm: initializer method is only used for interactive searches via the user interface, so I won’t discuss it further here. If you’ve a
good memory, you may remember that the initWithURL: method is passed the full URL that was originally passed to the app delegate’s application:openURL:sourceApplication:annotation:
method, before being passed to SPSURLSchemeController’s launch method, where our SPSSearchQuery instance was created.
An NSDictionary is created from the query string parameters to make working with them easier. This is done using the uq_queryDictionary method, which
comes from Jonathan Crooke’s handy NSURL+QueryDictionary category.
The search term and search results ordering are obtained from the dictionary and assigned to the instance variables backing the properties. In this case I assign
to the instance variables directly because the properties are declared as read-only, since they’re never going to change after being given initial values.
Also, it’s good practice to favour immutability whenever possible.
Now that we understand the SPSSearchQuery class, we can return to SPSSupermarketsViewController’s performSearchWithQuery: method, which performs a storyboard segue, passing our SPSSearchQuery object as the sender:
- (void)performSearchWithQuery:(SPSSearchQuery *)query
{
    [self performSegueWithIdentifier:kShowSearch sender:query];
}
The prepareForSegue:sender: method sets the passed SPSSearchQuery object as a property named searchQuery on the SPSSearchViewController class. This is the view controller underpinning
the Search All Offers screen, where search text is entered or previously saved searches selected:
SPSSearchViewController’s viewDidLoad method checks to see if a value has been assigned to its searchQuery property. If it has, then it sets the search bar’s text
to the search term within the SPSSearchQuery object and displays a user interface notification if the search term is fewer than the allowed number of minimum characters
(currently three). Otherwise, it performs a storyboard segue to the search results screen, again passing the SPSSearchQuery object as the sender:
#pragma mark - View Lifecycle

- (void)viewDidLoad
{
    [super viewDidLoad];

    ...

    // The search query was specified directly using a URL scheme, so set the search bar text and show the search results.
    if (self.searchQuery) {
        self.searchBar.text = self.searchQuery.searchTerm;

        if ([self.searchQuery.searchTerm length] < kMinimumSearchCharacters) {
            [self showSearchTermMinimumCharactersNotification];
            return;
        }

        [self performSegueWithIdentifier:kShowSearchResults sender:self.searchQuery];
    }
}
The viewDidLoad method in SPSSearchResultsViewController.m is shown below. It checks the previously mentioned URLSchemeSearch flag on the SPSSearchQuery
object. If it’s set then it assigns the view controller’s searchResultsOrder property to the value of the SPSSearchResultsOrder enum, which is also from the
SPSSearchQuery instance. Otherwise, the last used search results ordering is read from the defaults system. Finally, the selected segment in the UISegmentedControl
at the top of the screen is updated to reflect the correct ordering.
#pragma mark - View Lifecycle

- (void)viewDidLoad
{
    [super viewDidLoad];

    ...

    // The search query was specified directly using a URL scheme, so set the search results order directly, otherwise use NSUserDefaults.
    if (self.searchQuery.URLSchemeSearch) {
        self.searchResultsOrder = self.searchQuery.searchResultsOrder;
    } else {
        self.searchResultsOrder = [[SPSUserDefaults sharedInstance] searchResultsOrder];
    }

    self.searchResultsOrderControl.selectedSegmentIndex = self.searchResultsOrder;

    ...
}
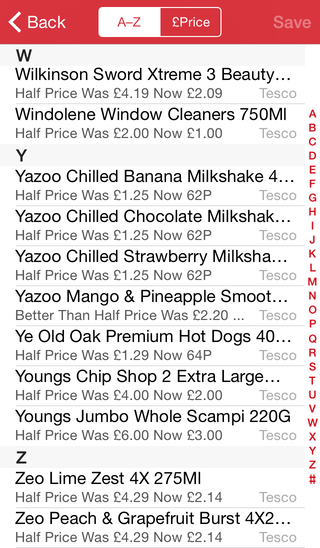
Elsewhere in the SPSSearchResultsViewController class, the search term and the search results ordering are used by an NSFetchedResultsController that provides
the data for the screen’s UITableView, but I shan’t cover that here as it’s not relevant to custom URL schemes. Here’s the result of it all:
We’ve covered a lot of ground in this post and indeed, it was quite a lot of effort to originally add URL scheme support to Daily Offers. That said, I think the facility is worth offering to your app’s users. The general pattern is to make sense
of the incoming URL and then route through the view controller stack to the view controller appropriate for the requested action, passing along the objects needed to perform
the action via view controller properties along the way.
14 September 2014
Daily Offers allows you to share the details of the selected offer
on Twitter or Facebook, or via text message or email. The offer details can also be copied to the clipboard or printed. This is how that looks in iOS 7:
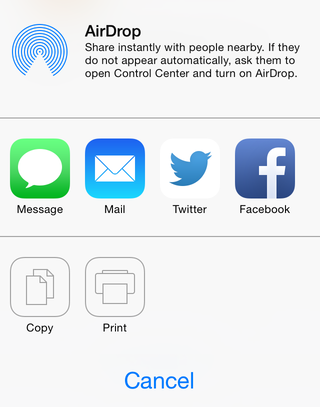
This is trivial to implement using the UIActivityViewController class. You specify the data objects on which the view controller should act, then
present the view controller, which displays the standard services. For example:
NSString *textToShare = // etc.
NSURL *urlToShare = // etc.

UIActivityViewController *activityViewController =
  [[UIActivityViewController alloc] initWithActivityItems:@[string, URL] applicationActivities:nil];
[navigationController presentViewController:activityViewController animated:YES completion:nil];
Although straightforward, one problem with this approach is that it assumes you want the same data object to be shared for each service. This wasn’t what I
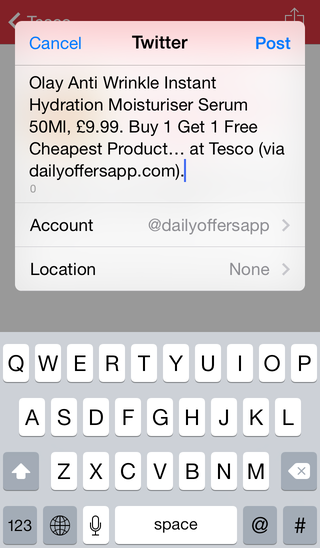
wanted for Daily Offers, because I knew that often the selected offer details text would be too long for the 140 character tweet limit mandated by Twitter.
The solution to this problem is to subclass the UIActivityProviderItem class. Instances of this class act as a proxy for data passed to the activity view controller.
Here’s the header file code for SPSActivityItemProvider:
//
//  SPSActivityItemProvider.h
//  Daily Offers
//
//  Created by John Topley on 08/02/2014.
//  Copyright (c) 2014 John Topley. All rights reserved.
//

@interface SPSActivityItemProvider : UIActivityItemProvider

- (instancetype)initWithPlaceholderItem:(id)placeholderItem twitterItem:(NSString *)twitterItem;

@end
The UIActivityItemProvider class has an initWithPlaceholderItem: initializer method. In my subclass I make this initWithPlaceholderItem:twitterItem:
to make it explicit that we’re doing something different for Twitter. Here’s the implementation code:
//
//  SPSTwitterActivityItemProvider.m
//  Daily Offers
//
//  Created by John Topley on 08/02/2014.
//  Copyright (c) 2014 John Topley. All rights reserved.
//

#import "SPSActivityItemProvider.h"

@implementation SPSActivityItemProvider {
    NSString *_twitterItem;
}

- (instancetype)initWithPlaceholderItem:(id)placeholderItem twitterItem:(NSString *)twitterItem
{
    self = [super initWithPlaceholderItem:placeholderItem];

    if (self) {
        _twitterItem = twitterItem;
    }

    return self;
}

- (id)item
{
    if ([self.activityType isEqualToString:UIActivityTypePostToTwitter]) {
        return _twitterItem;
    } else {
        return self.placeholderItem;
    }
}

@end
As you can see, there’s not much to it. The initializer method invokes the superclass initializer, passing it the default placeholder text. It also
assigns the passed text for Twitter to an instance variable. I should probably switch to using a property instead of an instance variable, but is it worth revisiting this code now we’re in the brave new world of Swift?
The item method is the one method that UIActivityItemProvider subclasses must override. This is the callback method that gets invoked when iOS asks for the item’s data.
The method checks to see if the activity type is UIActivityTypePostToTwitter. If it is, then it simply returns the text to use for Twitter, otherwise it returns
the default placeholder text that was passed to the initializer.
This is the code behind the Share navigation bar button in the Offer Details screen:
- (IBAction)share
{
   SPSActivityItemProvider *activityItemProvider =
     [[SPSActivityItemProvider alloc] initWithPlaceholderItem:[self sharedText]
                                                  twitterItem:[self twitterSharedText]];

   UISimpleTextPrintFormatter *printFormatter =
     [[UISimpleTextPrintFormatter alloc] initWithText:[self sharedText]];

   NSArray *sharedItems = @[activityItemProvider, printFormatter];
   UIActivityViewController *controller =
     [[UIActivityViewController alloc] initWithActivityItems:sharedItems applicationActivities:nil];

   controller.excludedActivityTypes =
     @[UIActivityTypePostToWeibo, UIActivityTypeAssignToContact, UIActivityTypeSaveToCameraRoll];

   [self presentViewController:controller animated:YES completion:nil];
}
An SPSActivityItemProvider instance is created and passed the standard offer details text to share, as well as the special Twitter variant returned by the
twitterSharedText method (this method truncates the offer details to 140 characters, inserting an ellipsis if required). This instance is put into an array
along with a UISimpleTextPrinterFormatter instance used for printing the offer details.
A UIActivityViewController is created as before and passed the array of items for sharing. Some activity types that aren’t applicable are excluded. Finally, the activity view controller’s
user interface is presented and the offer details can go viral on social media.
16 August 2014
Arguably the most controversial user interface change Apple introduced in iOS 7 was borderless buttons. Personally, whilst a fan in general of the cleaner iOS 7 look,
I like buttons to look like buttons by at least having a border to give some indication they can be tapped. Apple recognised there was an affordance issue by adding a Button Shapes
accessibility option to iOS 7.1.
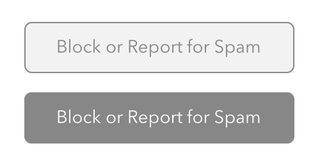
For Daily Offers I wanted to copy the simple bordered buttons that invert when tapped, as used in the Tweetbot Twitter app:
I decided to make my buttons using a couple of images: one for the normal button state and another for the highlighted state. It would also be possible to achieve
the desired effect purely in code; I’m sure PaintCode would make this trivial. This is what the button images look like (presented on a white background):

—They don’t look much like the Tweetbot buttons do they? The corners have a larger radius than the Tweetbot buttons because these are 2x Retina display images, so are actually
80 pixels tall for use with 40 pixel tall buttons. Each button is only 21 pixels wide, which seems like a strange number.
The key to this width is that the left button border is 10 pixels wide, so 5 pixels on the actual button. The middle of the button is only 1 pixel wide and finally the right border is also 10 pixels wide. 10px + 1px + 10px = 21px. As you might
have guessed by now, iOS supports stretchable images, whereby the ends of the image (called the “caps”) don’t stretch, but the middle does.
The UIImage convenience constructor resizableImageWithCapInsets: is used to create a new UIImage instance that will automatically stretch itself to the required size. I
encapsulated this code into a UIImage category. Here’s the header for UIImage+DailyOffersAdditions:
//
//  UIImage+DailyOffersAdditions.h
//  Daily Offers
//
//  Created by John Topley on 23/11/2013.
//  Copyright (c) 2013 John Topley. All rights reserved.
//

@interface UIImage (DailyOffersAdditions)

+ (UIImage *)dailyOffersNormalButton;
+ (UIImage *)dailyOffersHighlightedButton;

@end
Hopefully the purpose of two methods is self-explanatory. Here’s the implementation code for the category:
//
//  UIImage+DailyOffersAdditions.m
//  Daily Offers
//
//  Created by John Topley on 23/11/2013.
//  Copyright (c) 2013 John Topley. All rights reserved.
//

#import "UIImage+DailyOffersAdditions.h"

static NSString *const kNormalButton = @"Button";
static NSString *const kHighlightedButton = @"ButtonHighlighted";

@implementation UIImage (DailyOffersAdditions)

+ (UIImage *)dailyOffersNormalButton
{
    return [[UIImage imageNamed:kNormalButton] resizableImageWithCapInsets:UIEdgeInsetsMake(0.0f, 5.0f, 0.0f, 5.0f)];
}

+ (UIImage *)dailyOffersHighlightedButton
{
    return [[UIImage imageNamed:kHighlightedButton] resizableImageWithCapInsets:UIEdgeInsetsMake(0.0f, 5.0f, 0.0f, 5.0f)];
}

@end
The constants reference a couple of image sets within the app’s asset catalogue named Button and ButtonHighlighted. Each image set simply contains a single 2x
image for that button state. The calls to the UIEdgeInsetsMake macro specify that the middle of the button starts 5 pixels inset
from the left edge of the image and ends 5 pixels inset from the right edge. The top and bottom insets are both zero.
The Daily Offers About screen features six buttons and so is a good study of the category above in use. On this screen I took advantage of the
Tag property that Interface Builder provides for any purpose you can think of. I assigned the buttons unique tag values that are sequential, starting at 1000 for
the Website button in the top-left position and finishing at 1005 for the Rate This App button in the bottom-right place. An abridged version of
the implementation class for SPSAboutViewController is shown below:
//
//  SPSAboutViewController.m
//  Daily Offers
//
//  Created by John Topley on 05/04/2012.
//  Copyright (c) 2012 John Topley. All rights reserved.
//

#import "SPSAboutViewController.h"
#import "UIImage+DailyOffersAdditions.h"

// Button tags.
static NSUInteger const kWebsiteButton = 1000;
static NSUInteger const kRateThisAppButton = 1005;

@interface SPSAboutViewController ()

- (IBAction)cancel;
- (IBAction)emailFriend;
- (IBAction)emailSupport;
- (IBAction)openFacebook;
- (IBAction)openTwitter;
- (IBAction)openWebsite;
- (IBAction)rateApp;

@end

@implementation SPSAboutViewController {}

#pragma mark - User Interface

- (void)customizeButtonWithTag:(NSInteger)tag
{
    UIButton *button = (UIButton *)[self.view viewWithTag:tag];
    [button setBackgroundImage:[UIImage dailyOffersNormalButton] forState:UIControlStateNormal];
    [button setBackgroundImage:[UIImage dailyOffersHighlightedButton] forState:UIControlStateHighlighted];
}

#pragma mark - View Lifecycle

- (void)viewDidLoad
{
    [super viewDidLoad];

    for (NSInteger tag = kWebsiteButton; tag <= kRateThisAppButton; tag++) {
        [self customizeButtonWithTag:tag];
    }
}
A loop within the viewDidLoad method iterates through the tag values and calls the customizeButtonWithTag: method, passing it the tag’s value. The
customizeButtonWithTag: method gets a reference to the UIButton control identified by the passed tag and uses the category we saw earlier to set the appropriate
normal and highlighted button state background UIImage. And with that, we’re off to the races! Here’s what the final result looks like in Daily Offers, with the Rate This App button highlighted:

Finally, for your convenience here’s a download of the button images that also contains the source Acorn images I used to make them.
10 August 2014
When I released Daily Offers 1.3 back in July 2013, it was the most significant update I’d done to the app since launch.
The headline feature of that release was the ability to search for supermarket offers or products and allowing searches to be given a name and saved.
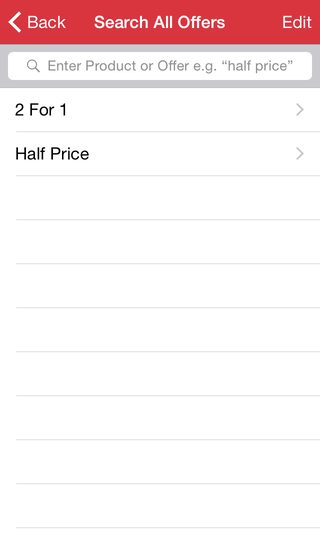
The entry point to this feature is the Search All Offers screen, which is a table view listing your saved searches that’s accessed from the Daily Offers
home screen. It implements the usual table view editing features of being able to delete your saved searches and change their order.
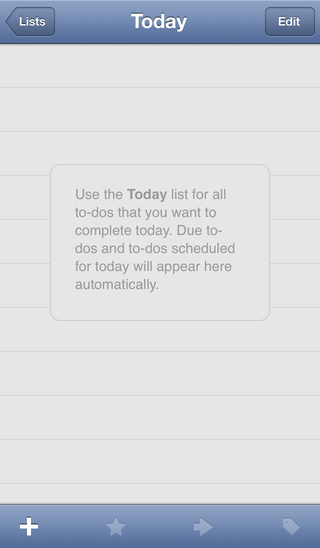
For the Search All Offers screen blank state I wanted to copy the approach used
in the Today screen in the Things task management app (which is my preferred iOS to-do list app):
The basic approach I took to achieve this is to have a SPSSearchViewController that subclasses UITableViewController. The table view within this view controller is
set to a new SPSExplanationTableView that subclasses UITableView. Here’s the header file code for SPSExplanationTableView:
//
//  SPSExplanationTableView.h
//  Daily Offers
//
//  Created by John Topley on 06/05/2013.
//  Copyright (c) 2013 John Topley. All rights reserved.
//

#import "SPSExplanationView.h"

@interface SPSExplanationTableView : UITableView

@property (nonatomic, weak, readonly) SPSExplanationView *explanationView;

@end
As you can see, it just has a single property for an SPSExplanationView. This is the bordered view that will contain the explanatory text and sit in the
middle of the table view when it’s empty. It’s exposed as a property so the view can be hidden by the search view controller after some searches have been saved.
The header for SPSExplanationView has a single convenience constructor method (I guess you’d call this a factory method in languages such as Java):
//
//  SPSExplanationView.h
//  Daily Offers
//
//  Created by John Topley on 28/04/2013.
//  Copyright (c) 2013 John Topley. All rights reserved.
//

@interface SPSExplanationView : UIView

+ (SPSExplanationView *)tableView:(UITableView *)tableView explanationWithText:(NSString *)text;

@end
And here’s the implementation code:
//
//  SPSExplanationView.m
//  Daily Offers
//
//  Created by John Topley on 28/04/2013.
//  Copyright (c) 2013 John Topley. All rights reserved.
//

#import "SPSExplanationView.h"
#import "UIColor+DailyOffersAdditions.h"

@implementation SPSExplanationView

+ (SPSExplanationView *)tableView:(UITableView *)tableView explanationWithText:(NSString *)text
{
    SPSExplanationView *explanationView = [[self alloc] initWithText:text];
    [tableView addSubview:explanationView];

    return explanationView;
}

- (instancetype)initWithText:(NSString *)text
{
    CGFloat y = (RETINA_4_DISPLAY) ? 163.0f : 120.0f;
    CGRect frame = CGRectMake(50.0f, y, 220.0f, 155.0f);

    if ((self = [super initWithFrame:frame])) {
        self.userInteractionEnabled = NO;
        self.backgroundColor = [UIColor whiteColor];
        self.layer.borderColor = [UIColor lightGrayColor].CGColor;
        self.layer.borderWidth = 0.5f;
        self.layer.cornerRadius = 8.0f;
        self.layer.masksToBounds = YES;

        UILabel *label = [[UILabel alloc] initWithFrame:CGRectMake(20.0f, 5.0f, 180.0f, 145.0f)];
        label.backgroundColor = [UIColor whiteColor];
        label.textColor = [UIColor lightGrayColor];
        label.numberOfLines = 0;
        label.lineBreakMode = NSLineBreakByWordWrapping;
        label.font = [UIFont italicSystemFontOfSize:SMALL_FONT_SIZE];
        label.text = text;

        [self addSubview:label];
    }

    return self;
}

@end
The tableView:explanationWithText: convenience constructor creates an SPSExplanationView and passes it the passed text to display within the view.
It then adds this new view as a subview of the passed table view. The initWithText: constructor does some maths to calculate the y position of
the view. This is because the iPhone currently has two different screen heights and we want the view to be nicely vertically centred within its parent table
view. It uses a macro named RETINA_4_DISPLAY to calculate the screen dimensions of the device on which it’s running. I got this macro from a Stack Overflow answer and
it looks like this:
// See http://stackoverflow.com/a/12447113/
#define DBL_EPSILON __DBL_EPSILON__
#define RETINA_4_DISPLAY (fabs((double) [UIScreen mainScreen].bounds.size.height - (double) 568) < DBL_EPSILON)
Now obviously all this positional code will have to be revisited once the rumoured larger screen iPhone(s) is/are on sale. It’s most definitely not forwards-compatible!
The rest of the initWithText: method is simply concerned with setting up the appearance of the view and adding a UILabel to it for displaying the explanation text.
You’ll hopefully remember that the SPSTableView class contained a single property for holding an instance of the SPSExplanationView class we’ve just been examining.
Here’s the implementation of SPSExplanationTableView:
//
// SPSExplanationTableView.m
// Daily Offers
//
// Created by John Topley on 06/05/2013.
// Copyright (c) 2013 John Topley. All rights reserved.
//
#import "SPSExplanationTableView.h"
@implementation SPSExplanationTableView
- (void)awakeFromNib
{
[super awakeFromNib];
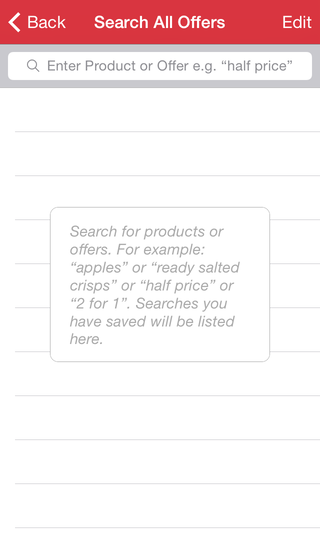
_explanationView = [SPSExplanationView tableView:self explanationWithText:@"Search for products or offers. For example: “apples” or “ready salted crisps” or “half price” or “2 for 1”. Searches you have saved will be listed here."];
}
- (void)layoutSubviews
{
[super layoutSubviews];
[self bringSubviewToFront:self.explanationView];
}
@end
The awakeFromNib message is sent when the class is loaded from an Interface Builder archive or a nib file. SPSExplanationTableView uses this opportunity to set its SPSExplanationView property to a new
instance using the tableView:explanationWithText: convenience constructor we saw earlier. It passes itself as the table view and some text that explains how to use the search feature. I found that I also had
to override the layoutSubviews method to make sure the SPSExplanationView appeared in front of its parent table view.
As a pedantic aside, Apple should really have named this method LayOutSubviews (with the capital "O"), as the verb lay out is different to the noun layout, and
laying out subviews is what we’re doing here. Anyway, with all that work done, here’s what the final result looks like in Daily Offers. Not too shabby!
7 August 2014
I can’t remember where I originally came across it, but this is a handy Objective-C macro I’m using in Daily Offers for constructing a UIColor instance from a CSS hex colour:
#define UIColorFromRGB(rgbValue) [UIColor colorWithRed:((float)((rgbValue & 0xFF0000) >> 16))/255.0 green:((float)((rgbValue & 0xFF00) >> 8))/255.0 blue:((float)(rgbValue & 0xFF))/255.0 alpha:1.0]
I popped it in DailyOffers-Prefix.pch so it’s available anywhere.
Here it is being used in a UIColor category I created that allows me to use semantic colour names throughout the Daily Offers code base:
//
//  UIColor+DailyOffersAdditions.m
//  Daily Offers
//
//  Created by John Topley on 02/08/2012.
//  Copyright (c) 2012 John Topley. All rights reserved.
//

#import "UIColor+DailyOffersAdditions.h"

@implementation UIColor (DailyOffersAdditions)

+ (UIColor *)dailyOffersMessageBarErrorColour
{
    return UIColorFromRGB(0xD96713);
}

+ (UIColor *)dailyOffersMessageBarInfoColour
{
    return UIColorFromRGB(0x0C877A);
}

+ (UIColor *)dailyOffersMessageBarSuccessColour
{
    return UIColorFromRGB(0x26B310);
}

+ (UIColor *)dailyOffersSectionIndexColour
{
    return UIColorFromRGB(0xD3131F);
}

+ (UIColor *)dailyOffersSeparatorColour
{
    return UIColorFromRGB(0xC8C7CC);
}

+ (UIColor *)dailyOffersStatusBarColour
{
    return UIColorFromRGB(0xD3131F);
}

@end