Explanation Table View
10 August 2014
When I released Daily Offers 1.3 back in July 2013, it was the most significant update I’d done to the app since launch. The headline feature of that release was the ability to search for supermarket offers or products and allowing searches to be given a name and saved.
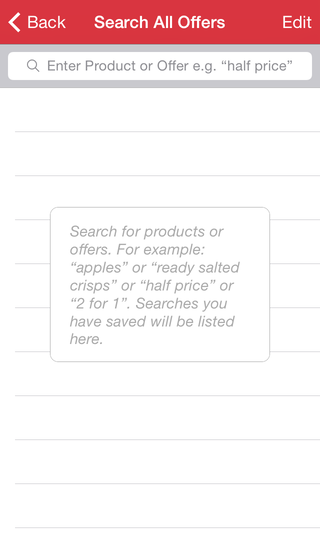
The entry point to this feature is the Search All Offers screen, which is a table view listing your saved searches that’s accessed from the Daily Offers home screen. It implements the usual table view editing features of being able to delete your saved searches and change their order.
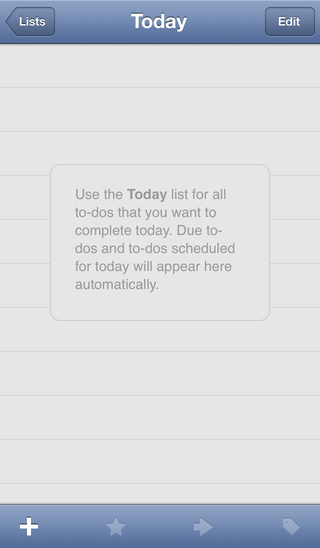
For the Search All Offers screen blank state I wanted to copy the approach used in the Today screen in the Things task management app (which is my preferred iOS to-do list app):
The basic approach I took to achieve this is to have a SPSSearchViewController that subclasses UITableViewController. The table view within this view controller is set to a new SPSExplanationTableView that subclasses UITableView. Here’s the header file code for SPSExplanationTableView:
//
//  SPSExplanationTableView.h
//  Daily Offers
//
//  Created by John Topley on 06/05/2013.
//  Copyright (c) 2013 John Topley. All rights reserved.
//

#import "SPSExplanationView.h"

@interface SPSExplanationTableView : UITableView

@property (nonatomic, weak, readonly) SPSExplanationView *explanationView;

@end
As you can see, it just has a single property for an SPSExplanationView. This is the bordered view that will contain the explanatory text and sit in the middle of the table view when it’s empty. It’s exposed as a property so the view can be hidden by the search view controller after some searches have been saved. The header for SPSExplanationView has a single convenience constructor method (I guess you’d call this a factory method in languages such as Java):
//
//  SPSExplanationView.h
//  Daily Offers
//
//  Created by John Topley on 28/04/2013.
//  Copyright (c) 2013 John Topley. All rights reserved.
//

@interface SPSExplanationView : UIView

+ (SPSExplanationView *)tableView:(UITableView *)tableView explanationWithText:(NSString *)text;

@end
And here’s the implementation code:
//
//  SPSExplanationView.m
//  Daily Offers
//
//  Created by John Topley on 28/04/2013.
//  Copyright (c) 2013 John Topley. All rights reserved.
//

#import "SPSExplanationView.h"
#import "UIColor+DailyOffersAdditions.h"

@implementation SPSExplanationView

+ (SPSExplanationView *)tableView:(UITableView *)tableView explanationWithText:(NSString *)text
{
    SPSExplanationView *explanationView = [[self alloc] initWithText:text];
    [tableView addSubview:explanationView];

    return explanationView;
}

- (instancetype)initWithText:(NSString *)text
{
    CGFloat y = (RETINA_4_DISPLAY) ? 163.0f : 120.0f;
    CGRect frame = CGRectMake(50.0f, y, 220.0f, 155.0f);

    if ((self = [super initWithFrame:frame])) {
        self.userInteractionEnabled = NO;
        self.backgroundColor = [UIColor whiteColor];
        self.layer.borderColor = [UIColor lightGrayColor].CGColor;
        self.layer.borderWidth = 0.5f;
        self.layer.cornerRadius = 8.0f;
        self.layer.masksToBounds = YES;

        UILabel *label = [[UILabel alloc] initWithFrame:CGRectMake(20.0f, 5.0f, 180.0f, 145.0f)];
        label.backgroundColor = [UIColor whiteColor];
        label.textColor = [UIColor lightGrayColor];
        label.numberOfLines = 0;
        label.lineBreakMode = NSLineBreakByWordWrapping;
        label.font = [UIFont italicSystemFontOfSize:SMALL_FONT_SIZE];
        label.text = text;

        [self addSubview:label];
    }

    return self;
}

@end
The tableView:explanationWithText: convenience constructor creates an SPSExplanationView and passes it the passed text to display within the view. It then adds this new view as a subview of the passed table view. The initWithText: constructor does some maths to calculate the y position of the view. This is because the iPhone currently has two different screen heights and we want the view to be nicely vertically centred within its parent table view. It uses a macro named RETINA_4_DISPLAY to calculate the screen dimensions of the device on which it’s running. I got this macro from a Stack Overflow answer and it looks like this:
// See http://stackoverflow.com/a/12447113/
#define DBL_EPSILON __DBL_EPSILON__
#define RETINA_4_DISPLAY (fabs((double) [UIScreen mainScreen].bounds.size.height - (double) 568) < DBL_EPSILON)
Now obviously all this positional code will have to be revisited once the rumoured larger screen iPhone(s) is/are on sale. It’s most definitely not forwards-compatible! The rest of the initWithText: method is simply concerned with setting up the appearance of the view and adding a UILabel to it for displaying the explanation text.
You’ll hopefully remember that the SPSTableView class contained a single property for holding an instance of the SPSExplanationView class we’ve just been examining. Here’s the implementation of SPSExplanationTableView:
//
//  SPSExplanationTableView.m
//  Daily Offers
//
//  Created by John Topley on 06/05/2013.
//  Copyright (c) 2013 John Topley. All rights reserved.
//

#import "SPSExplanationTableView.h"

@implementation SPSExplanationTableView

- (void)awakeFromNib
{
    [super awakeFromNib];
    _explanationView = [SPSExplanationView tableView:self explanationWithText:@"Search for products or offers. For example: “apples” or “ready salted crisps” or “half price” or “2 for 1”. Searches you have saved will be listed here."];
}

- (void)layoutSubviews
{
    [super layoutSubviews];
    [self bringSubviewToFront:self.explanationView];
}

@end
The awakeFromNib message is sent when the class is loaded from an Interface Builder archive or a nib file. SPSExplanationTableView uses this opportunity to set its SPSExplanationView property to a new instance using the tableView:explanationWithText: convenience constructor we saw earlier. It passes itself as the table view and some text that explains how to use the search feature. I found that I also had to override the layoutSubviews method to make sure the SPSExplanationView appeared in front of its parent table view.
As a pedantic aside, Apple should really have named this method LayOutSubviews (with the capital "O"), as the verb lay out is different to the noun layout, and laying out subviews is what we’re doing here. Anyway, with all that work done, here’s what the final result looks like in Daily Offers. Not too shabby!